We got married! (DIY details)
It wouldn't be my wedding if there weren't any handmade touches.
The invitation
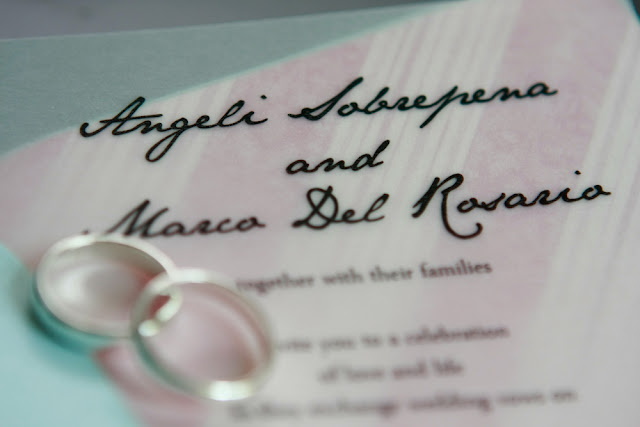
We were on a tight budget, so we considered going the easy route and send the invites through email, facebook, or SMS. But being the crafty girl that I am, I couldn't stand not making an effort. I'm not much of a graphic designer, so I knew I couldn't make the e-mail invites as special as I wanted them to be. But give me paper, scissors, and glue, and I can whip something chic but cheap.
So with the blessing of my hubby-to-be, I trooped to National Bookstore and bought ready-made textured aqua envelopes and some glue. I planned on lining the envelopes with pretty fabric. I had a collection of fabrics at home, but just as a fail-safe, I bought half a yard of some shabby chic fabric for Php65 (about US $1.45).
The invite set the theme, and from here on I knew what I wanted the wedding to look like.
I already did the layout for the invite text the night before, so I had it printed on translucent paper which looked like vellum, but was a lot harder. It cost around Php16 per invite. I would then print a map of the venue at home, on blue board paper (printing of the map would be free, care of my mom's printer, teehee).
When I got home, I traced an outline of one side of the envelope onto the fabric, and proceeded to cut them out. I slid the fabric into the envelope, but realized I couldn't glue them together properly without having to cut open the envelope. Fail. So I decided to make my own envelopes out of the same blue board paper the maps were to be printed on. I opened up one ready-made envelope, and made a template. I then cut each envelope by hand.
The process was time-consuming, but boy did I have fun! When Marco saw the handmade envelopes, he said they were pretty, but they might be too pretty for our wedding. He said I was putting too much effort into it. He suggested we use the ready-made envelopes without lining instead. I replied in true crafty fashion, "Do not take away from me this chance to be creative!". Lol. I actually said that, verbatim. I already had all the materials I needed anyway, so it wasn't like it was costing us extra. But I eventually gave in. I only made a few of the special handmade ones for our Ninongs and Ninangs, and grandparents. Other envelopes were lined with pretty scrapbook paper instead of fabric (as in the photo above). Others remained plain, without lining.
I wish I could post DIY pics here, but I didn't exactly have the time to take step-by-step photos. I will update this post when I have pics.
The theme
I decided on a summery, floral theme, with a bit of vintage touches. I would use my tiny lattice lanterns and old tin cans as vases, and these will serve as centerpieces at the reception. I knew they'd be too tiny, but what could I do, floral bouquets will cost us a pretty penny, and were bound to be thrown away after a few days. I wasn't about to throw away our money. These DIY centerpieces were better than nothing, I decided.
The makeup
For a girl who doesn't know how to apply makeup, you'd think hiring a stylist would be the best option. But fate decided to play a trick on me, and sent my go-to parlorista away on vacation. So I had to look for a decent parlor that was near my place (I didn't want to travel far on the day of my wedding) to do my makeup. Hiring a makeup artist was out of the question - we didn't have a budget for that.
Thank goodness I had the right mind to request for a trial makeup session. It gave me the chance to see how ghastly I would look like under the hands of the parlorista I went to. I asked for a light, natural look, but the parlorista interpreted it as white, cakey makeup. I looked like I was ready to be buried! Even my dad couldn't help but comment, "Anong ginawa nila? (What did they do to you?)". LOL!
But I loved what they did to my hair. So I decided to do my own makeup, but I would go back to the parlor so they could add soft curls to my hair. My mom would help me put eye makeup on. I would do the rest.
I looked okay, I think...
We did okay. :)
The invitation
 |
| I don't have a better photo of the handmade envelopes yet |
So with the blessing of my hubby-to-be, I trooped to National Bookstore and bought ready-made textured aqua envelopes and some glue. I planned on lining the envelopes with pretty fabric. I had a collection of fabrics at home, but just as a fail-safe, I bought half a yard of some shabby chic fabric for Php65 (about US $1.45).
The invite set the theme, and from here on I knew what I wanted the wedding to look like.
I already did the layout for the invite text the night before, so I had it printed on translucent paper which looked like vellum, but was a lot harder. It cost around Php16 per invite. I would then print a map of the venue at home, on blue board paper (printing of the map would be free, care of my mom's printer, teehee).
When I got home, I traced an outline of one side of the envelope onto the fabric, and proceeded to cut them out. I slid the fabric into the envelope, but realized I couldn't glue them together properly without having to cut open the envelope. Fail. So I decided to make my own envelopes out of the same blue board paper the maps were to be printed on. I opened up one ready-made envelope, and made a template. I then cut each envelope by hand.
The process was time-consuming, but boy did I have fun! When Marco saw the handmade envelopes, he said they were pretty, but they might be too pretty for our wedding. He said I was putting too much effort into it. He suggested we use the ready-made envelopes without lining instead. I replied in true crafty fashion, "Do not take away from me this chance to be creative!". Lol. I actually said that, verbatim. I already had all the materials I needed anyway, so it wasn't like it was costing us extra. But I eventually gave in. I only made a few of the special handmade ones for our Ninongs and Ninangs, and grandparents. Other envelopes were lined with pretty scrapbook paper instead of fabric (as in the photo above). Others remained plain, without lining.
I wish I could post DIY pics here, but I didn't exactly have the time to take step-by-step photos. I will update this post when I have pics.
The theme
I decided on a summery, floral theme, with a bit of vintage touches. I would use my tiny lattice lanterns and old tin cans as vases, and these will serve as centerpieces at the reception. I knew they'd be too tiny, but what could I do, floral bouquets will cost us a pretty penny, and were bound to be thrown away after a few days. I wasn't about to throw away our money. These DIY centerpieces were better than nothing, I decided.
The makeup
 |
| Mom helping me with the makeup |
Thank goodness I had the right mind to request for a trial makeup session. It gave me the chance to see how ghastly I would look like under the hands of the parlorista I went to. I asked for a light, natural look, but the parlorista interpreted it as white, cakey makeup. I looked like I was ready to be buried! Even my dad couldn't help but comment, "Anong ginawa nila? (What did they do to you?)". LOL!
But I loved what they did to my hair. So I decided to do my own makeup, but I would go back to the parlor so they could add soft curls to my hair. My mom would help me put eye makeup on. I would do the rest.
I looked okay, I think...
We did okay. :)


Comments
By the way, where do you shop for fabrics?